DIY Horizontal Fence Plans: Elevate Your Curb Appeal with Modern Design
Horizontal fences have surged in popularity, offering a sleek, modern alternative to traditional vertical designs. If you’re looking to enhance your property’s aesthetic while adding privacy and security, exploring DIY horizontal fence plans is an excellent option. This guide provides a comprehensive overview, covering everything from planning and material selection to construction and maintenance, empowering you to build a stunning horizontal fence yourself.
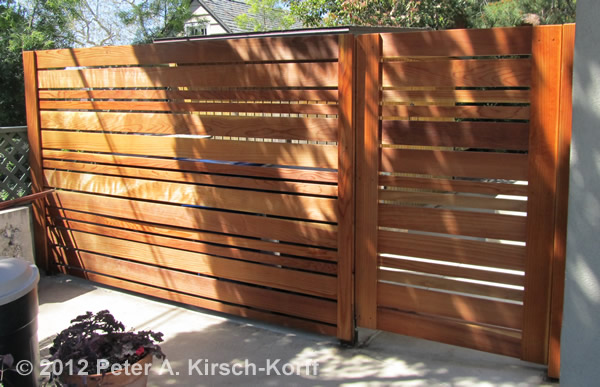
Why Choose a Horizontal Fence?
Before diving into DIY horizontal fence plans, let’s consider the benefits of this contemporary style:
- Modern Aesthetic: Horizontal lines create a clean, minimalist look that complements modern and contemporary homes.
- Enhanced Curb Appeal: A well-designed horizontal fence can significantly boost your property’s visual appeal, potentially increasing its value.
- Perceived Width: Horizontal lines can make your yard appear wider and more spacious.
- Privacy and Security: Like any fence, a horizontal fence provides privacy and security, deterring unwanted visitors.
- Customization: DIY horizontal fence plans offer a high degree of customization, allowing you to tailor the design to your specific needs and preferences.
Planning Your Horizontal Fence Project
Careful planning is crucial for a successful DIY horizontal fence project. Here’s what to consider:
Permits and Regulations
Before you begin, check with your local building department to determine if you need a permit. Many municipalities have regulations regarding fence height, materials, and setback requirements. Ignoring these regulations could result in fines or the need to dismantle your fence. Also, check with your homeowner’s association (HOA) for any restrictions on fence styles or materials.
Property Lines and Utilities
Accurately identify your property lines to avoid encroaching on your neighbor’s land. Consider hiring a surveyor if you’re unsure. Before digging, contact your local utility companies to locate any underground lines (gas, electric, water, etc.). Damaging these lines can be dangerous and expensive.
Fence Design and Layout
Determine the desired height and length of your fence. Consider the purpose of the fence (privacy, security, aesthetics) and choose a design that meets your needs. Sketch out your fence layout, including the location of posts, gates, and any decorative elements. Think about the spacing between the horizontal boards. Wider spacing offers a more open feel, while closer spacing provides greater privacy.
Material Selection
Choosing the right materials is essential for the longevity and appearance of your horizontal fence. Common options include:
- Wood: Cedar, redwood, and pressure-treated lumber are popular choices for their durability and natural beauty. Cedar and redwood are naturally resistant to rot and insects, while pressure-treated lumber is treated to prevent decay.
- Composite: Composite fencing is made from a blend of wood fibers and plastic, offering excellent durability and low maintenance. It resists rot, insects, and fading.
- Metal: Metal fencing, such as aluminum or steel, is another durable option. It requires minimal maintenance and can be powder-coated in various colors.
For posts, consider using pressure-treated lumber or metal posts set in concrete for maximum stability. Choose screws or nails that are suitable for outdoor use to prevent rust and corrosion.
DIY Horizontal Fence Plans: Step-by-Step Guide
Now, let’s walk through the steps of building your own horizontal fence:
Step 1: Gather Your Materials and Tools
Before you start, gather all the necessary materials and tools. This will save you time and frustration later on. You’ll need:
- Lumber or composite boards for the horizontal slats
- Posts (pressure-treated or metal)
- Concrete mix
- Screws or nails (exterior grade)
- Post-hole digger or auger
- Level
- Measuring tape
- Circular saw
- Drill or impact driver
- Safety glasses
- Gloves
Step 2: Set the Posts
The posts are the foundation of your fence, so it’s crucial to set them properly. Dig post holes that are deep enough to extend below the frost line in your area (typically 2-3 feet). Space the posts evenly, usually 6-8 feet apart. Place the posts in the holes and use a level to ensure they are plumb (perfectly vertical). Pour concrete mix into the holes around the posts, following the manufacturer’s instructions. Brace the posts with temporary supports until the concrete has fully cured.
Step 3: Attach the Horizontal Slats
Once the concrete has cured, you can begin attaching the horizontal slats. Start with the bottom slat, ensuring it is level and evenly spaced from the ground. Use screws or nails to attach the slat to the posts. Continue adding slats, maintaining a consistent spacing between each one. Use a level to ensure that each slat is straight and level. For a clean, professional look, consider using a spacer block to maintain consistent spacing between the slats.
Step 4: Add Finishing Touches
After all the slats are attached, inspect the fence for any imperfections. Trim any overhanging edges and sand any rough spots. Apply a sealant or stain to protect the wood from the elements. Consider adding decorative post caps to enhance the appearance of your fence. You may also want to add a gate for access to your yard. [See also: How to Build a DIY Garden Gate].
Horizontal Fence Design Ideas
DIY horizontal fence plans are incredibly versatile. Here are some design ideas to inspire you:
- Alternating Widths: Use horizontal slats of varying widths to create a dynamic and visually interesting pattern.
- Staggered Joints: Stagger the joints where the horizontal slats meet to add strength and visual appeal.
- Contrasting Colors: Use different colors or stains for the posts and slats to create a striking contrast.
- Metal Accents: Incorporate metal accents, such as metal posts or decorative metal panels, for a modern industrial look.
- Built-in Planters: Integrate planters into your fence design to add greenery and visual interest.
Maintaining Your Horizontal Fence
Proper maintenance is essential for extending the life of your horizontal fence. Here are some tips:
- Regular Cleaning: Clean your fence regularly with soap and water to remove dirt, mildew, and algae.
- Staining or Sealing: Reapply stain or sealant every few years to protect the wood from the elements.
- Inspect for Damage: Regularly inspect your fence for signs of damage, such as rot, cracks, or loose screws. Repair any damage promptly to prevent further deterioration.
- Trim Vegetation: Keep vegetation trimmed away from your fence to prevent moisture buildup and pest infestations.
Cost Considerations for DIY Horizontal Fence Plans
The cost of a DIY horizontal fence can vary depending on the materials you choose, the size of your fence, and your skill level. Wood is generally the least expensive option, while composite and metal are more expensive. Consider the long-term cost of maintenance when making your decision. While wood may be cheaper upfront, it requires more frequent maintenance than composite or metal. Factor in the cost of tools and supplies, such as concrete, screws, and stain. Get quotes from multiple suppliers to ensure you’re getting the best price. Remember to factor in the cost of permits, if required.
Troubleshooting Common Issues
Even with careful planning, you may encounter some challenges during your DIY horizontal fence project. Here are some common issues and how to address them:
- Uneven Ground: If your yard is uneven, you may need to adjust the height of the posts to maintain a consistent fence height. Consider using a stepped fence design to accommodate changes in elevation.
- Warped Boards: Warped boards can be difficult to work with. Try to straighten them by clamping them to a flat surface or using a heat gun. If the warping is severe, it’s best to replace the board.
- Loose Posts: If your posts become loose over time, you may need to add more concrete or use post anchors to reinforce them.
Conclusion
Building a DIY horizontal fence is a rewarding project that can significantly enhance your property’s aesthetic and value. By following these DIY horizontal fence plans and tips, you can create a stunning and durable fence that will last for years to come. Remember to plan carefully, choose quality materials, and take your time. With a little effort and attention to detail, you can achieve professional-looking results. Embrace the challenge and enjoy the satisfaction of building your own beautiful horizontal fence. The clean lines and modern appeal of a horizontal fence make it a worthwhile investment for any homeowner looking to upgrade their outdoor space. Don’t hesitate to customize your fence to reflect your unique style and preferences. A well-designed and well-built horizontal fence can transform your yard into a private oasis.
